Paul Robertson's words, punctuated

Thoughts on development, user-centered design, code, etc. by Paul Robertson

Flash Builder 4.5 tip: Use code templates

One great feature in Flash Builder 4.5 is the Code Templates feature. I wrote about these a bit when the public beta came out last fall, but I wanted to share more about them.

The templates (also known as “snippets”) feature allows you to define chunks of code that you use repeatedly. The templates show up as code hints, so to access a template just hit Ctrl+Space (or another key that you’ve defined to trigger code hints) and you will see them in the list.

Templates are listed in the code hint menu.

Hit Ctrl+Space again to filter the code hints so that only template code hints show up.

Templates are listed by themselves if you hit Ctrl+space again.

Only the code hints that apply to the context where the cursor is positioned show up in the list–for example, if the cursor is inside a method, you won’t see the template for creating a function, but you will see the template for a for loop (“fori”).

Accept the code hint and the template is inserted:

Select the template and it is inserted in the code.

One of the best things about templates is they really are “templated” as their name suggests. You can define variables in templates, and they show up as outlined areas in the inserted code (as shown in the image above). (See my post on creating templates and using template variables for more on template variables.)

You can hit TAB to jump through the different variable positions. Usually there is also a tab location at the end of the template (sometimes it’s specified as a location within the template) where you can go when you’ve finished building it out.

Flash Builder 4.5 tip: Supercharge your code hints and code completion

I was a C# programmer for a while and I have to admit, I was spoiled by Visual Studio. Some people don’t like lots of code assistance. I’m not one of those people. Since I moved to mostly ActionScript coding I’ve been hunting for an editor that comes close to the features Visual Studio has, specifically with regards to code hints and code completion.

FlashDevelop is based (conceptually) on Visual Studio (it’s actually based on SharpDevelop, which is modeled after the .NET world) so not surprisingly FlashDevelop has great code hint features. Unfortunately, since I moved to a Mac I haven’t been able to use FlashDevelop. (I’ve tried, but it’s just way too slow to run it in a VM.)

With that in mind, for the Flash Builder 4.5 release I filed several feature requests to hopefully get code hinting and code completion on par with FlashDevelop. Sadly it’s not all the way there yet, but happily they accepted and implemented some of my feature requests (and others are in the “under consideration” bin).

Here’s what’s available today, and at the end I’ll talk about what I hope comes in the future.

Accept code hints with space and other characters

Problem 1: In Flash Builder 4, when you have a code hint and you get to the item you want, you have to hit Enter to accept it. When I’m trying to code quickly, I feel like I’m hitting Enter every third or fourth character. Ugh.

But not anymore! New in Flash Builder 4.5, you can specify a set of characters that serve as keys to “accept” code hints. When a code hint is showing and you hit one of those keys, the code hint is entered and the character is entered as well. So (for example) you can type a few characters from a variable name and hit “.” and the variable name (and the period) are added to the code:

Flash Builder 4.5 Code Completion with custom characters from Paul Robertson on Vimeo.

However, this feature is turned off by default, so you have to turn it on to make it work.

Go to Flash Builder Preferences > Flash Builder > Editors > ActionScript Code. In the bottom of the preferences pane you’ll see a section titled “Code completion”:

Code completion preferences pane

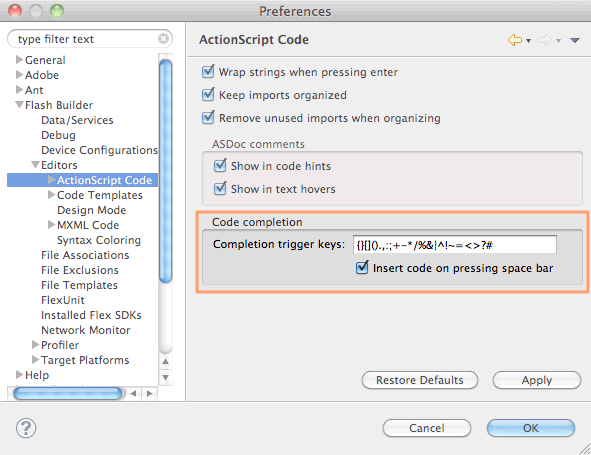
I believe the trigger keys are empty by default, but you can see the set of keys I specify in the screenshot. It’s pretty much every character that is legal in ActionScript but isn’t legal as part of an identifier name. If you want to copy and paste them, here they are:

{}[]().,:;+-*/%&|^!~=<>?#

Note that I also check the box to have the space bar accept a code hint.

I used to include the single and double quote characters but I found that they triggered more false positives than anything, and I couldn’t think of a situation where I’d be typing a variable or method name and the next character would be a quote character (without a space or operator in between). So I removed them, and I’m happy with that choice.

Make code hints appear automatically

Problem 2: You don’t have to hit Enter to accept code hints, but you still have to hit Ctrl+Space every fourth character to open the code hint menu in the first place.

Once again, this is now a problem of the past. Flash Builder 4.5 lets you specify a set of characters that automatically make the code hint menu appear when you type them.

Flash Builder 4.5 Code Assist triggers from Paul Robertson on Vimeo.

In Flash Builder 4.5 Preferences, choose Flash Builder > Editors:

Code assist preferences pane

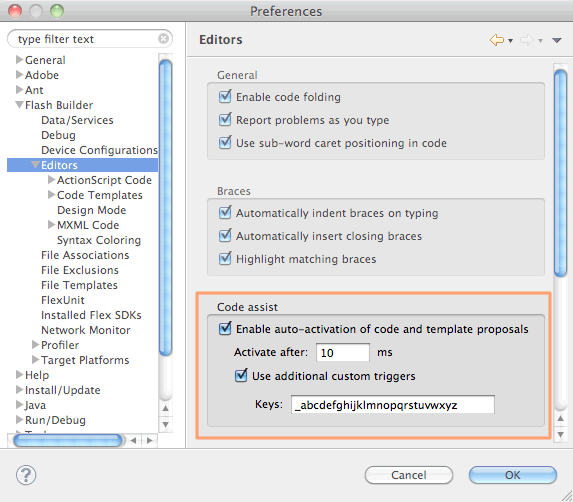
In the middle of the panel there is a section titled “Code assist.” First of all, to enable this feature you need to check the box “Enable auto-activation of code and template proposals.”

I like my code hints to appear quickly, so as you can see I change the “activate after” time to 10 milliseconds.

Next you need to check the “Use additional custom triggers” checkbox. This is what turns on the magic. By default the set of lowercase letters is in the box. Because I prefix private members with an underscore (_) I add that character to the set as you can see in the screenshot.

As a side note, this set of characters is almost the exact opposite of the characters I specified to accept code hints–in this case it’s all the characters (except “$” and numbers) that are legal in identifiers.

And now for the bad news

Unfortunately, these two settings are great on their own but when you combine them you run into a bit of trouble.

Specifically, since ActionScript keywords like var, new, const, function etc. contain letters, any time you start typing them they will trigger the code hint menu. That’s okay in general, most of the keywords they are unique and once you type enough characters there is no matching code hint so the menu closes.

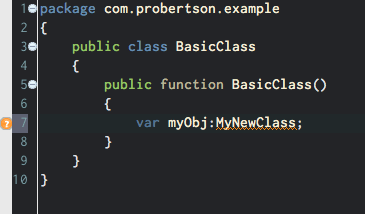
Unfortunately, some of the keywords do have matching items in code hints. For example, the keyword function is spelled the same as the Function class, so when you type the word “function” the “Function” entry in the code hint is selected. Then, when you get to the end of the word and hit <space>, it’s a trigger to accept the suggestion so “function” gets replaced with “Function.” Ugh.

Function/function is one I run into a lot. Another one I hit a lot is new triggering the NewObjectSampler class. NewObjectSampler? What’s that? Its a class in the flash.sampler package that I’ve never once used, but since it’s a built-in class it’s always available to code hints. (Maybe this is just Flash Builder’s way of telling me that I need to use more dependency injection and factory patterns instead of using new. =)

Depending on what libraries you have imported, other keywords can trigger code hints as well. This is especially troublesome when you’re using libraries that are built around reflection (since they tend to have classes that are named for language features). I run into problems when using FlexUnit and Mockolate, for example.

So, are these new code assist and code completion features useless? Not at all; they’re still very cool, and hopefully in the next release they’ll be perfected. In the mean time there are a few workarounds, although I admit that none of them are ideal for me:

  • Use auto-trigger or auto-accept but not both: If your code hints aren’t auto-triggered, keywords won’t trigger the code hint menu. But you’ll be back to typing Ctrl+Space a lot. If you only accept code hints with Enter, when you finish typing “function” and type space the code hint will be ignored instead of accepted. But then you’re back to typing Enter all the time.
  • Only auto-trigger with underscore (_): If you are like me and you use the underscore (_) character as a prefix for member variables (or something like that) then you actually use underscore a lot. I’ve tried having the auto-trigger behavior turned on but only using underscore to trigger the behavior. This works pretty well, but I still end up having to use Ctrl+Enter more than I’d like.
  • Use Esc to cancel code hints: This is part of the compromise I’ve settled on. Whenever I type “function” I hit Esc at the end of the word, which closes the code hint menu. I can then type space without auto-accepting the code hint.
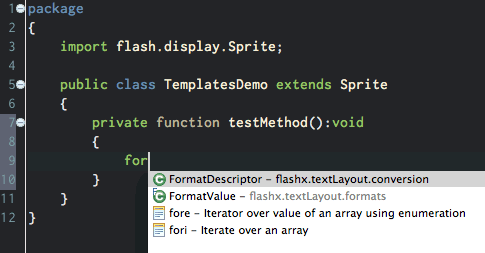
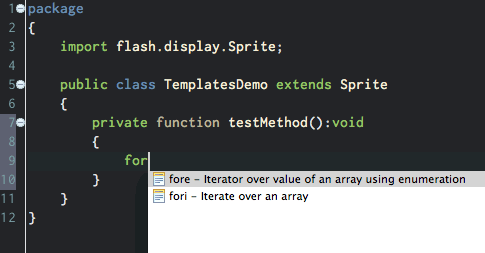
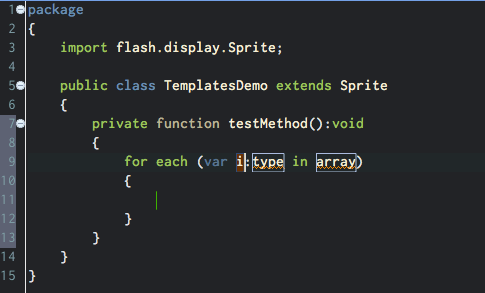
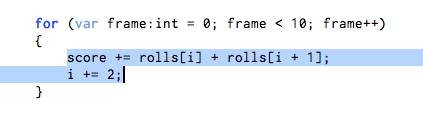
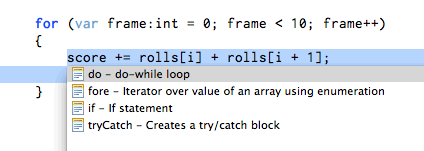
  • Use templates: I also do this, though it’s somewhat awkward because it requires you to change your typing habits. Here’s an example: create a template named “fn” (short for “function”). In the body of the template enter “function ” (note the space after the word function). Now when you type “fn<space>” the word “function” (followed by a space) is entered into the editor, assuming you don’t have a class or something else that starts with “fn.”

    (Why do you need the space in the template? Unlike other code hints, when you accept a template code hint with a character, that character isn’t entered into the editor. That makes sense because most templates have variables, so if the character you typed to accept the code hint was entered (as it is with other code hints) you would end up with the character in a variable position or something weird like that.)

    You can also create a set of templates with abbreviated codes for different types of functions, variables, etc. This is actually handy to do anyway. For example, I have templates named “prv” for private var [name]:[Type] and “pf” for public function [name]([arguments]):[Type] {}.

    However, overall this solution is hard to get used to because you have to remember to type “fn” or some other key combination instead of “function” (and “nw” instead of “new,” etc.) or “prv” and “prf” etc. Unfortunately I have too many years of muscle memory going against me to make this a completely workable solution.

Moving forward

These are unfortunate issues, but the Flash Builder team is aware of them and they’ve told me that they’re anxious to improve things for the next version, which is a good thing.

If you’re interested in having great(er) code hints in Flash Builder, consider voting for these feature requests so we can “encourage” the Flash Builder team to move forward more quickly on these issues:

Flash Builder 4.5 tip: Share code templates

Last fall when the Flash Builder “Burrito” beta was released at MAX, I shared several templates that I created.

It’s easy to share templates with others, which is great for teams or just for helping others so they don’t have to re-invent the wheel. Templates (like other settings) are not persisted between workspaces by default, so if you use multiple workspaces in Flash Builder, this is a way you can get your templates in your workspaces too.

Importing templates

To add a template to Flash Builder 4.5 (such as one of the ones I’ve shared):

  1. open Flash Builder preferences
  2. expand the Flash Builder > Editors > Code Templates section
  3. choose the category for the templates you’re importing (ActionScript, CSS, Flash Builder, or MXML)

  4. Click the “Import” button and browse to the file containing the templates you want to import (an XML file).
  5. Choose “Open” and the templates are imported into Flash Builder.

Exporting templates

To share your own templates with others:

  1. open Flash Builder preferences
  2. expand the Flash Builder > Editors > Code Templates section
  3. choose the category for the templates you’re importing (ActionScript, CSS, Flash Builder, or MXML)
  4. select the template(s) you want to export. (If you select more than one, they are exported into a single XML file.)
  5. Click the “Export” button and browse to the location where you want to save the template XML file.
  6. Choose “Save” and the template XML file is saved.

Flash Builder 4.5 Tip: Customize templates and create your own

I’ve written about using templates in Flash Builder 4.5. However, chances are you’re going to want to edit some of the templates that come with Flash Builder 4.5, and create your own. Admittedly I’ve become a bit addicted to templates, so I have a rule for myself that once I need a particular block of code more than a couple of times, I stop and turn it into a template.

Here’s an example of editing one of the pre-installed code templates. This is one of the first changes I made, editing the “fori” template (which creates a for loop) to use a variable for the array’s length instead of referencing the Array.length property:

  1. open Flash Builder preferences
  2. expand the Flash Builder > Editors > Code Templates section
  3. choose the category for the template you want to edit (“ActionScript” in this case)

  4. Scroll the list and select the “fori” template. Click the “Edit” button.
  5. Replace the code block with the following code:

    for (var ${index}:int = 0, len:int = ${array}.length; ${index} < len; ${index}++)
    {
        ${line_selection}${cursor}
    }
  6. Choose “OK” and the template is updated.

Adding a template variable

In this case the code in the for loop just declares a variable named len that stores the array’s length value. If you want to customize the name of the variable that stores the length property, you can use a template variable in place of the hardcoded len.

Template variables are specified using the following syntax:

${variable_name}

In this example, if you use the same variable name in both places where len appears in the template then when you’re using the template you will only have to change it once to have it change everywhere in the template. For example, to make the len variable a template variable, use this code:

for (var ${index}:int = 0, ${len}:int = ${array}.length; ${index} < ${len}; ${index}++)
{
    ${line_selection}${cursor}
}

The name you give to the variable (the text between the curly braces) is the default text that’s inserted into the template.

Special template variables

In addition to your own custom template variables, there are also several built-in template variables that have special values. Some of these are “constant” values for a given file–for example, the ${enclosing_type} variable inserts the name of the current class. Others use the code model to populate a list of choices. For instance, the ${field} variable gives you a list of all the class-level variables and the ${local_var} variable gives you a list of all the variables that are in-scope in the current method.

To see the list of built-in template variables, click the “Insert Variable…” button or just type “$” and a code-hint menu will appear.

Once you’ve created your own templates, make sure to share your templates with others so we can steal benefit from your ideas.

Flash Builder 4.5 tip: Use Block Selection mode

One new feature in Flash Builder 4.5 that’s small but incredibly useful is the new block selection mode. (Sometimes known as multi-line selection mode.)

This feature allows you to edit the same position in a block of lines at once. This is very useful when you’re copying and pasting a block of code and you only need to change one thing, like a variable name, in several lines of code. The video below demonstrates this much more clearly than I could explain it in text.

To toggle block selection mode, click this toolbar button (it’s close to the “Mark Occurrences” highlighter button):

Block Selection mode icon in Flash Builder 4.5

You can also use the keyboard shortcut Ctrl/Cmd+Alt+A.

As promised, here’s a video demo I put together showing a couple of my most common uses for Block Selection mode. (You’ll obviously want to watch it in full screen, or at least at a larger size on the video’s Vimeo page.)

Block Selection Mode in Flash Builder 4.5 from Paul Robertson on Vimeo.

Flash Builder 4.5 tip: Quick fixes for external classes and interfaces

The public beta of Flash Builder “Burrito” that was released at MAX included several “quick fix” features. For example, if you typed the name of a property or method that didn’t exist in the current class, you could hit Ctrl/Cmd+1 and create the missing item.

The final release of Flash Builder takes this much farther. Here are some of the additional quick fixes that I like the best:

Create class or interface

If you want to use a class that you haven’t created yet, there’s no need to break your train of thought. Go ahead and type in the class name:

var myObj:MyNewClass;

Also new since the MAX build, you’ll see yellow squigglies show up warning you that something’s wrong:

Flash Builder 4.5 showing a warning about a possible syntax error (an unrecognized class).

Move the cursor to the warning and hit Ctrl/Cmd+1 to see the new quick fix options:

Flash Builder 4.5 shows a menu of available.

If you choose “Create new Class” or “Create new Interface” the new class/new interface wizard appears, just as if you had chosen it from the menu.

Create property or method in external class

You can also now create properties (instance variables) and methods in an external class the same way:

myObj.someValue = 12;
myObj.doStuff();
Flash Builder 4.5 Create Class dialog box.

Just as with the class name, move the cursor to the relevant place and hit Ctrl/Cmd+1:

Flash Builder 4.5 quick fix for creating a method in an external class.

Hit Enter (or double-click) to create the new method. You don’t jump to the class automatically, but you can navigate to it in the usual ways to see the new class with the generated code:

The generated class with its generated property and method.

Unfortunately this doesn’t work for creating properties and methods in an interface. (The quick fix appears, but it just creates the method in the current class rather than in the interface.) Vote for the bug Generate from usage doesn’t generate interface methods so we can get it in the next version.

Flash Builder 4.5 tip: Use a custom FlexUnit framework

I’ve been getting into unit testing and test-driven development a lot lately. Flash Builder has pretty nice support for FlexUnit, which I find to be the easiest way to include testing in my development workflow.

However, one problem is that Flash Builder ships on a different schedule than FlexUnit, so when a new FlexUnit version comes out Flash Builder doesn’t include it until at least the next major release. This has turned out to be a problem for me. Flash Builder 4.5 includes FlexUnit 4. However, FlexUnit 4 has a bug that makes it so you can’t run more than a certain number of tests. (I can’t remember how many exactly, and it probably varies a bit, but it’s something like 25 or 30.) If you’re doing TDD you’re going to hit that limit. This bug is fixed in FlexUnit 4.1…but of course since FlexUnit 4.1 is still a “release candidate” it isn’t included with Flash Builder 4.5.

Fortunately, the Flash Builder team realized that they can’t depend on being in sync with FlexUnit for every release. There’s a new feature in Flash Builder 4.5 that lets you specify an alternate FlexUnit framework to use instead of the one that’s bundled with Flash Builder.

To specify your alternative FlexUnit is easy:

  1. Open Flash Builder Preferences > Flash Builder > FlexUnit
  2. In the “Alternative Framework Settings” section check the “Use alternative framework” box
  3. In the “Framework directory” field browse to the folder where you put your alternative FlexUnit sdk

The trick is knowing how to set up your FlexUnit framework folder. Flash Builder expects certain SWCs to be in certain places. Unfortunately the names and setup of the built-in framework folder in Flash Builder don’t match the download from the FlexUnit site, so you have to do a little manual rearranging.

Here’s how to lay out your FlexUnit framework directory:

  1. Create the top-level directory
  2. Inside that directory, create three subdirectories with the following names:

    • ASProject
    • FlexProject
    • Common
  3. Browse to the FlexUnit download page
  4. Download the “full project download” “4.1 SDK” version
  5. Unzip the download and open the folder
  6. Copy the FlexUnit AS3 SWC (currently “flexunit-4.1.0-8-as3_4.1.0.16076.swc”) into the “ASProject” folder in your FlexUnit framework directory.
  7. Copy the FlexUnit Flex SWC (currently “flexunit-4.1.0-8-flex_4.1.0.16076.swc”) into the “FlexProject” folder you created.
  8. Copy the “turnkey/libs/hamcrest-as3-flex-1.1.3.swc” file into the “Common” folder you created.
  9. If you use other extensions with FlexUnit, copy those SWCs into the “Common” folder also.

    For example, I use Mockolate with some of my tests, so I downloaded Mockolate and put the SWC (currently “mockolate-0.10.0.swc”) in the “Common” folder.

    Update: Mockolate has now been updated to version 0.11.0, and in the new download it has separate “as3” and “flex” SWCs. Since there are separate SWCs it’s probably best to put them in their respective folders instead of the “Common” folder, but I haven’t had a chance to test this and verify it.

  10. Tell Flash Builder to use your FlexUnit framework instead of the built-in one, as described above.

I think it’s great that Flash Builder lets you specify your own FlexUnit framework now. The biggest problem I ran into was just confusion on how to set up the custom framework folder, especially the question of which SWCs go where. I’ve talked to Adobe and to Mike Labriola (representing FlexUnit) about this and they have said they definitely want to make things easier. Ideally (from my perspective at least) they’ll make a drop-in “Flash Builder” download bundle that’s all set up for use in Flash Builder.

Sample and links from “PlayBook App Development Hands-on”

Yesterday I presented a hands-on training session at 360|Flex on developing AIR applications for the BlackBerry PlayBook. The session focused on two major areas: getting the tools set up for development, and using the QNX UI components and framework. (I hardly talked about Flex development for PlayBook at all, since that’s fairly similar to Flex for Android etc.)

As part of the session we walked through building a PlayBook application. The app was adapted from an example created by Renaun Erickson – big thanks to Renaun for sharing that.

Here are the application files:

During the presentation I also showed and talked about a few other open-source examples and projects that are useful for developing with the QNX UI framework. Here are links to those resources:

360|Flex Denver ride sharing

Update April 4, 2011: In response to this post, Super Shuttle contacted me directly and offered to set up a group discount rate for 360|Flex. The biggest benefit of the group rate over doing a ride share is you don’t have to worry about coordinating with others (and waiting around, if you’re the first in your group to arrive). The discount price is about the same as what you’d get if you are able to get 3 people sharing a ride together both ways–so it’s not unbeatable but it’s pretty good. I’ll still leave the survey up but you’re probably just as well off by signing up for the discounted rate with Super Shuttle.

Last year I organized ride-sharing between the airport and the 360|Flex DC conference. It worked out pretty well and I at least thought it was convenient, so I’ve decided to do the same thing again this year for the 360|Flex Denver conference (April 10-13, 2011).

Here’s how it works:

  1. Fill out the 360|Flex Denver ride-sharing survey to tell me when you’re flying into and leaving Denver
  2. I’ll find people who are arriving and leaving about the same time and I’ll send you an email so you can get together and coordinate a ride. (One email for your “arrival” group and one for your “departure” group.)
  3. You can arrange the ride however you want, but I generally recommend using Super Shuttle. I’ve used them before and had good success. A ride from the Denver airport to the conference should be about $33 for the first person plus $9 for each additional person. (So you can see there’s a big benefit in getting together with other people if you split the total cost evenly.)

That’s it! I look forward to seeing you at the conference!

“Wrap selection” - more “Burrito” template goodness

I already mentioned that I really like the new templates feature in Flash Builder “Burrito.” Last night I discovered another nice feature in the templates.

I was looking through the template variables and noticed one called ${line_selection}. This variable allows you to select some lines of code and then choose a template to “wrap” around the selected code. A couple of the pre-defined templates make use of this, and I quickly added it to others where it makes sense.

For example, one pretty common refactor is to have a line of code* and decide that you need to wrap it in an if statement.

To wrap a line of code in an if statement:

  1. Start by selecting the code you want to wrap:

  2. Important: My instinct at this point is to type the name of the template (e.g. if) before hitting Ctrl+space. Don’t do it! You’ll just replace the selection with what you type. Unfortunately you can’t type the name of the template in this process. Instead do this:

    Hit Ctrl+space to open code hints. Tip: Hit Ctrl+space again to filter the code hints so only templates are shown. Flash Builder is smart enough to recognize that you have lines selected and only shows templates that include the ${line_selection} variable:

  3. Use the arrow keys or mouse to choose the template you want.

    I love that Flash Builder shows the tooltip with the template output preview:

    (Yes, the indentation in the preview is a bit wonky – hopefully that will be fixed for the final release.)

  4. Hit <Enter> to accept the template, and you’re ready to go. Just like with any template, you can tab between fields (just one in this case) to change other variable data:

Notes

* The code example I’m using here comes from the ”Bowling Game Kata” by “Uncle” Bob Martin